We've all been there. You buy a beautiful, compact Echeveria rosette, bring it indoors, and a few weeks later, it looks like it's trying to escape its pot. The stem is long and twisted, the leaves are spaced far apart, and the vibrant colors have faded to a pale green.
This phenomenon is called **etiolation**, often referred to as a plant being "leggy." While it looks disheartening, it's one of the easiest succulent problems to fix. In fact, fixing a leggy succulent is a great opportunity to multiply your collection!
Here is your definitive guide to understanding why this happens and how to perform surgery to restore your plant's beauty.
What is Etiolation?
Simply put, etiolation is a plant's desperate search for light. When a succulent isn't receiving adequate sunlight (most need at least 4-6 hours of direct or bright indirect light daily), it stretches rapidly toward the nearest light source.
The plant sacrifices stem strength and leaf density just to grow taller in hopes of finding the sun. The result is a weak, spindly plant that often leans heavily to one side.
The Fix: "Beheading" Your Succulent
Don't worry, this sounds more drastic than it is. Since the stretched-out part of the stem will never shrink back down, the only way to fix a leggy succulent is pruning. We are going to cut the compact top off and re-root it.

Step-by-Step "Surgery" Guide:
1. **Gather Tools:** You need a clean, sharp pair of scissors, pruning shears, or a sterilized knife.
2. **Identify the Cut Zone:** Look at your plant. Usually, the very top of the plant is still somewhat compact. You want to cut the stem about an inch or two *below* that compact rosette.
3. **Make the Cut:** Snip through the stem cleanly. Don't be afraid!
4. **Clean Up the Rosette:** Gently wiggle off the lower leaves on the cuttings stem until you have a bare stalk about an inch long. (Save those leaves for propagation!).
5. **The Crucial Step - Callousing:** Do **not** plant the cutting immediately. Place the rosette in a dry, shaded spot with good airflow for 3-5 days. The cut end needs to dry out and form a "scab" or callous. If you plant it while wet, it will rot.
6. **Replant:** Once calloused, nestle the stem into dry, well-draining succulent soil. Wait another week before watering lightly.
Don't Throw Away the Base!
You should now have three parts: the "beheaded" top rosette, the original potted base with a long stem, and several individual leaves you removed.
The stump you left in the pot is still alive with a healthy root system. If you continue to care for it, it will soon sprout baby succulents (pups) from wherever leaves were attached or directly from the cut top.
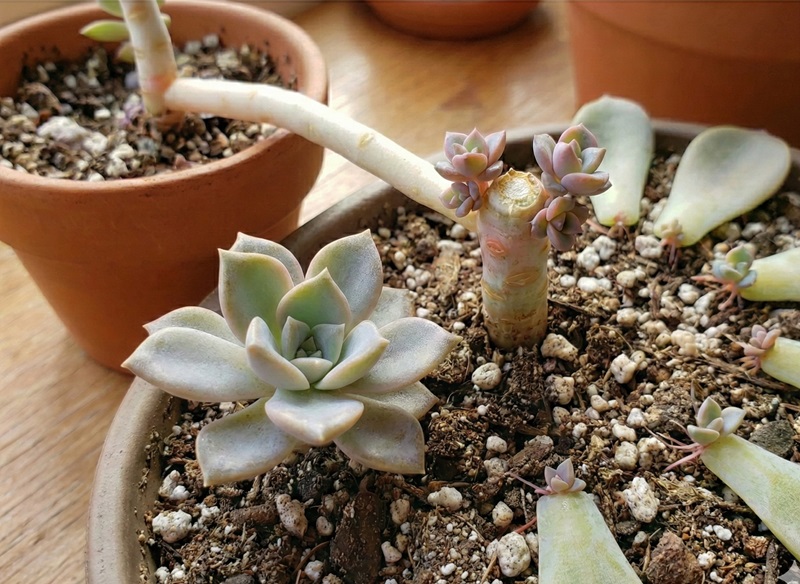
In a few months, that ugly stump will become a "mother plant" covered in new, compact rosettes that you can harvest later.
Conclusion
Fixing a leggy succulent requires a bit of courage to make that first cut, but the rewards are immense. Instead of watching one sad plant slowly decline, you now have a restarting rosette, a mother stump producing babies, and leaf propagations on the way.
Remember, to prevent this from happening again, ensure your rejuvenated plants get plenty of bright light!